


Uneven skin tone, dark patches, and stubborn spots can shake your confidence, but you don’t need to wait months for skincare products to work. Makeup offers an instant solution. When applied correctly, it can make pigmentation virtually invisible while still looking like real skin.
This guide walks you through every step, from skin prep to setting spray, using techniques that professional makeup artists rely on.
Page Contents
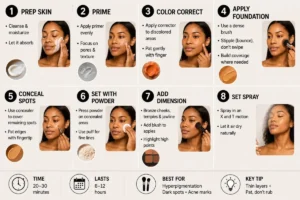
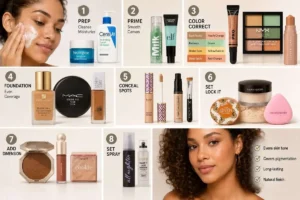
- Step 1: Skin Preparation – The Non-Negotiable Base
- Step 2: Primer – Creating a Smooth Canvas
- Step 3: Color Correcting – The Science of Neutralizing
- Step 4: Foundation – Choosing the Right Level of Coverage
- Step 5: Spot Concealing – Precision Work
- Step 6: Setting Powder – Locking Everything Down
- Step 7: Bringing Life Back to the Face
- Step 8: Setting Spray – The Final Seal
- What the Science Says About Pigmentation
- Frequently Asked Questions
- Final Thoughts
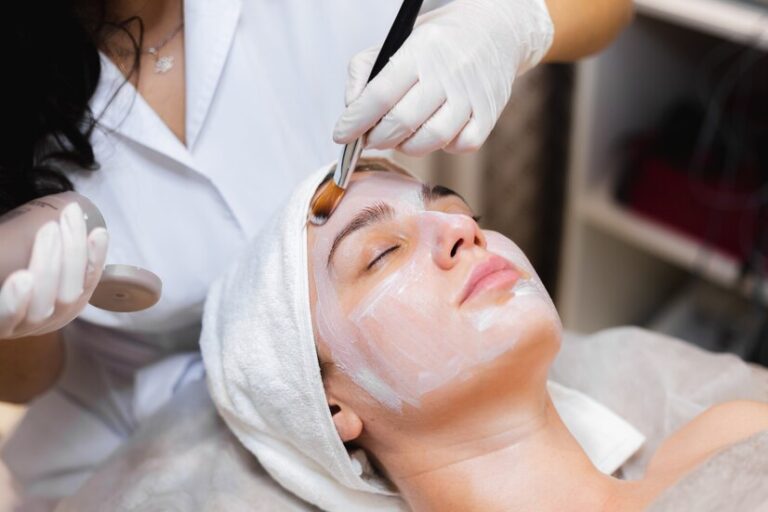
Step 1: Skin Preparation – The Non-Negotiable Base
Pigmentation becomes more noticeable on dry or flaky skin because light bounces unevenly off the surface. Start by cleansing your face with a gentle, non-stripping wash. Follow with a hydrating moisturizer that suits your skin type. Oily skin types should use a gel-based moisturizer, while dry skin benefits from a richer cream.
Wait three to five minutes before applying anything else. This allows the moisturizer to fully absorb so your makeup doesn’t slide around.
Buy a gentle cleanser: CeraVe Hydrating Facial Cleanser at Ulta
Buy a hydrating moisturizer: Neutrogena Hydro Boost Water Gel at Target
Step 2: Primer – Creating a Smooth Canvas
Primer serves two purposes when hiding pigmentation. First, it fills in texture irregularities like enlarged pores or raised scars. Second, it gives your foundation something to grip onto, preventing it from fading or migrating throughout the day.
For pigmentation, choose a primer with a slightly tacky finish rather than a slippery silicone feel. The tackiness helps pigment from your foundation and concealer stay exactly where you place it.
Buy a tacky primer: Milk Makeup Hydro Grip Primer at Sephora (Australia) – Note: Available at Sephora US and other retailers
Buy an affordable option: ELF Power Grip Primer + 4% Niacinamide
Step 3: Color Correcting – The Science of Neutralizing
Color correcting works because of basic color theory. Opposite shades on the color wheel cancel each other out. You apply a thin layer of corrector directly onto the pigmented area, then blend the edges so only the discoloration is covered.
Expert Insight: Celebrity makeup artist Danessa Myricks, who has worked with clients across all skin tones, explains why color correction is non-negotiable for pigmentation: “Peach corrector is the universal solution for dark spots on medium skin tones. For deeper complexions, you need to go into orange or even red. The goal is to neutralize before you ever touch foundation. Most people skip this step and then wonder why their spots still show through.”
Myricks, founder of Danessa Myricks Beauty, has over two decades of experience in the industry and is widely cited as an authority on inclusive makeup techniques for hyperpigmentation.
Here is the breakdown of which corrector shade to use based on your pigmentation type and skin tone:
| Pigmentation Type | Corrector Shade | Why It Works |
|---|---|---|
| Dark brown spots on fair to medium skin | Peach | Opposite of blue-brown tones |
| Dark brown spots on medium to tan skin | Orange | Stronger neutralization for deeper pigment |
| Red acne marks or post-inflammatory erythema | Green | Opposite of red on the color wheel |
| Purple under-eye circles | Yellow or salmon | Lifts purple tones effectively |
| Deep, dark spots on brown and deep skin | Red-orange or brick red | Cancels deep blue-black pigment |
Expert Insight: Renowned makeup artist Pat McGrath, known for her work on fashion runways and editorial shoots, emphasizes the importance of corrector texture: “Cream correctors are superior for pigmentation because they melt into the skin rather than sitting on top. Liquid correctors can be too thin and move around. Press the cream in with your ring finger – the warmth of your skin activates the product.”
Use your ring finger to pat the corrector on. Never rub. You want the product to sit on top of the discoloration, not get wiped away.
Buy a peach corrector: LA Girl HD Pro Conceal in Peach – Specifically labeled to neutralize dark spots for light skin tones
Buy a green or yellow corrector: NYX Professional Makeup Color Correcting Concealers – Green corrects redness, yellow cancels purple under-eyes
Buy a red-orange corrector for deep skin: Fenty Beauty Match Stix in Truffle
Step 4: Foundation – Choosing the Right Level of Coverage
Not all foundations work well for hiding pigmentation. Sheer or light-coverage formulas allow the discoloration to peek through. You need a foundation labeled as “full coverage” or “buildable medium to full.”
Liquid foundations work best for normal to oily skin. Cream foundations suit dry or mature skin because they contain more emollients. Apply the foundation with a dense, flat-top brush using stippling motions – bounce the brush up and down rather than swiping. Swiping pushes product away from the areas you want to cover.
Focus extra foundation on the center of your face where pigmentation tends to cluster: the cheeks, forehead, and around the mouth.
Buy a full-coverage liquid foundation: Estée Lauder Double Wear Stay-in-Place Makeup – *36-hour wear, transfer-proof, available in 55+ shades*
Buy a full-coverage concealer/foundation hybrid: MAC Studio Fix Every-Wear All-Over Face Pen – *36-hour wear, waterproof, natural matte finish*
Step 5: Spot Concealing – Precision Work
After foundation, examine your face in natural light. Some spots will still be visible. This is where concealer comes in. Use a concealer that matches your foundation shade exactly – not lighter. Lighter concealer draws attention to the spot instead of hiding it.
Apply the concealer with a small, pointed brush. Paint it directly onto the pigmented area, leaving a thin rim of skin visible around the edges. Then use a clean fingertip to pat the edges so they blend into your foundation. The center of the spot should still have full concealer coverage.
Buy a multi-use concealer: MAC Studio Fix Every-Wear Concealer Pen – Medium-to-full buildable coverage, does not cake or crease
Buy a budget concealer: LA Girl HD Pro Conceal – Lightweight, crease-resistant, brush-tip applicator
Step 6: Setting Powder – Locking Everything Down
Liquid and cream products will move throughout the day unless you set them with powder. Use a loose, translucent powder rather than a tinted one. Tinted powders can alter the color of your concealer and make pigmentation look ashy or gray.
Dip a small, fluffy brush into the powder, tap off the excess, then press the powder directly onto the concealed spots. Do not sweep. Pressing pushes the powder into the product while sweeping knocks it off.
For areas with fine lines, use a powder puff to press a very thin layer. Then spray your puff with setting spray and press again. This technique, called “baking,” prevents creasing.
Step 7: Bringing Life Back to the Face
Full-coverage foundation and concealer can leave your face looking flat because they hide your natural skin variations. You need to add dimension back. Use a matte bronzer on the perimeter of your face – the temples, below your cheekbones, and along your jawline.
Add a cream or powder blush to the apples of your cheeks. The warmth from the blush distracts the eye from any remaining pigmentation. Finish with a subtle highlighter on the high points of your cheeks, the bridge of your nose, and your cupid’s bow.
Step 8: Setting Spray – The Final Seal
Setting spray does two things. It melts all the powder layers together so your face looks like skin rather than a mask. It also creates a polymer film on top of your makeup that resists sweat, oil, and humidity.
Hold the bottle eight to ten inches from your face. Spray in an “X” and “T” motion – across from left to right, then diagonally both ways. Let it air dry completely. Do not fan or pat your face while it dries.
What the Science Says About Pigmentation
While makeup hides pigmentation temporarily, understanding the underlying causes helps you manage it better. According to the American Academy of Dermatology (AAD) , hyperpigmentation occurs when excess melanin forms deposits in the skin. The AAD notes that hyperpigmentation is best treated with a combination of sun protection and topical ingredients like vitamin C, azelaic acid, and retinoids. Makeup should be viewed as a complementary tool, not a treatment.
Cited Source: American Academy of Dermatology Association. Hyperpigmentation: Who gets and causes. Available at: aad.org
Furthermore, a 2021 review published in the Journal of Clinical and Aesthetic Dermatology found that consistent use of broad-spectrum sunscreen (SPF 30 or higher) is the single most important factor in preventing existing pigmentation from worsening. The study emphasized that without sun protection, even the best makeup techniques cannot stop dark spots from deepening over time.
Cited Source: Sarkar, R., et al. (2021). Melasma and Post-Inflammatory Hyperpigmentation: A Comprehensive Review. Journal of Clinical and Aesthetic Dermatology, 14(6), 38–45.
Expert Insight: Board-certified dermatologist Dr. Mona Gohara, Associate Clinical Professor at Yale School of Medicine, advises: “Makeup is an excellent immediate solution for pigmentation, but I tell my patients not to forget the long game. A tinted mineral sunscreen with iron oxides not only protects against UV but also blocks visible light, which is a major trigger for dark spots in darker skin tones. Layer that under your foundation.”
Dr. Gohara, who serves on the Skin of Color Society board, has published extensively on hyperpigmentation in melanin-rich skin and is a trusted voice in medical dermatology.
Frequently Asked Questions
Can I use powder foundation to hide pigmentation?
Yes, but only if you layer it correctly. Apply a liquid or cream concealer first, set it with translucent powder, then buff a powder foundation over the top. Powder foundation alone rarely provides enough coverage for dark spots.
How do I stop concealer from disappearing after two hours?
You likely have oily skin around the pigmented area. Before applying concealer, dust a whisper-thin layer of translucent powder onto the bare skin. Apply concealer on top, then set again with powder. This “powder sandwich” absorbs oil before it can break down the concealer.
Will color corrector work on very dark skin?
Yes, but you need the right shade. Fair and medium skin tones use peach or orange. Dark and deep skin tones need red-orange or even brick red correctors. Fenty Beauty makes deeper corrector shades specifically for melanin-rich skin .
Expert Insight: Celebrity makeup artist Sir John, who has worked with Beyoncé and Naomi Campbell, explains: “For deep skin, do not be afraid of orange or red correctors. They look scary in the pan but disappear once you blend. The mistake is using too little. You need full opacity over the dark spot, then foundation on top.”
Can I hide pigmentation without foundation?
Absolutely. Use a peach or orange color corrector only on the spots, blend the edges, then go over each spot with a full-coverage concealer that matches your skin. Set with powder. Leave the rest of your face bare. This “spot concealing only” technique looks very natural.
How do I remove makeup without irritating pigmentation?
Use an oil-based cleanser or a cleansing balm. Oil dissolves makeup without scrubbing. Rub the oil onto dry skin, add a few drops of water to emulsify, then rinse. Follow with a gentle water-based cleanser. Avoid scrubbing or using rough washcloths on pigmented areas.
Final Thoughts
Hiding pigmentation with makeup is a skill that improves with practice. The order of operations matters more than the price of your products. Always: moisturize, prime, color correct, foundation, spot conceal, set with powder, then add blush and bronzer. Skip any step, and the pigmentation will find a way to show through.
Start with drugstore products to master the technique. Once you feel confident, invest in higher-end formulas that last longer and require less touching up throughout the day.
Medical Disclaimer : This content is for informational purposes only and does not constitute medical advice. The information provided is based on cosmetic techniques and general skincare knowledge. Pigmentation can sometimes indicate an underlying medical condition. See a board-certified dermatologist for persistent, changing, or painful pigmentation issues. Do not use makeup as a substitute for professional medical evaluation.