


Page Contents
- How to Do a Pedicure at Home: A Step by Step Guide for Soft, Healthy Feet
- Why Bother Doing It Yourself?
- What You Actually Need
- The Real Step by Step Guide
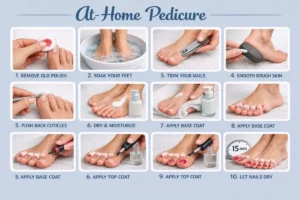
- Step 1: Remove Old Polish
- Step 2: Soak Your Feet (But Not Too Long)
- Step 3: Trim Your Toenails
- Step 4: Use a Pumice Stone or Foot File
- Step 5: Push Back Cuticles (Do Not Cut Them)
- Step 6: Dry Your Feet Completely
- Step 7: Apply Foot Lotion
- Step 8: Apply Base Coat (If Using Polish)
- Step 9: Paint Your Toenails
- Step 10: Apply Top Coat
- 10 Quick Answers for Home Pedicures
- The Bottom Line
How to Do a Pedicure at Home: A Step by Step Guide for Soft, Healthy Feet
Let’s be honest. A salon pedicure costs $35 to $60 plus tip. Doing it yourself at home costs basically nothing after you buy the tools once. You also avoid the foot tubs that salons sometimes fail to clean properly. No more worrying about fungus or rushed appointments.
This guide will walk you through a real pedicure you can do on your couch or bathroom floor. No fancy equipment required. Just your feet, some basic supplies, and 30 minutes.
Why Bother Doing It Yourself?
Two reasons. Money and hygiene.
A salon pedicure adds up fast. If you go once a month, that is $500 to $700 per year. You can buy all the supplies for $30 and use them for two years.
Also, salon foot baths can grow bacteria if not sanitized correctly. At home, you control the cleanliness. No shared tools. No mystery water.
What You Actually Need
You do not need a $100 foot spa. A plastic basin or even a large bowl works fine.
The basics (buy these once):
-
Basin or large plastic bowl
-
Nail clippers (toenail size, not fingernail size)
-
Pumice stone or foot file
-
Cuticle pusher (wooden stick or metal pusher)
-
Towel (old one is fine)
-
Cotton balls or pads
Consumables you already have or can buy cheap:
-
Warm water
-
Epsom salt or bath soap (optional but helpful)
-
Foot scrub or body scrub
-
Foot lotion or cream
-
Rubbing alcohol (for sanitizing)
Optional for polish:
-
Base coat
-
Nail polish color
-
Top coat
-
Nail polish remover
The Real Step by Step Guide
Step 1: Remove Old Polish
Before you do anything else, take off any old nail polish. Use nail polish remover and cotton balls. Do not skip this step. Fresh polish will peel right off if you paint over old polish.
Step 2: Soak Your Feet (But Not Too Long)
Fill your basin with warm water. Not hot. Warm like bath water. Add one of these options:
-
Half a cup of Epsom salt (great for sore feet)
-
A squirt of body wash or dish soap (yes, dish soap works fine)
-
Nothing at all (water alone is fine)
Soak your feet for 5 to 10 minutes. Do not soak longer than that. Too much soaking actually dries out your skin and makes your nails too soft to cut cleanly.
Step 3: Trim Your Toenails
Pull your feet out of the water. Dry them slightly so your nails are not slippery.
Use toenail clippers, not fingernail clippers. Toenail clippers are larger and straighter.
Cut straight across. Do not curve the corners. Curved corners lead to ingrown toenails every time. Leave a tiny bit of white at the tip of each nail. Do not cut all the way down to the pink part.
Step 4: Use a Pumice Stone or Foot File
This is where you get rid of rough, calloused skin. Focus on your heels and the balls of your feet.
Get the pumice stone wet. Rub it back and forth or in small circles on dry, rough areas. Do not scrub so hard that your skin feels raw or sore. A light to medium pressure is plenty. Rinse your feet when you are done.
Pro tip: Do this step when your feet are still damp from soaking but not soaking wet. Dry feet do not exfoliate well. Very wet feet are too soft and you can overdo it.
Step 5: Push Back Cuticles (Do Not Cut Them)
Use your cuticle pusher or the flat end of a wooden stick. Gently push back the thin skin at the base of each toenail.
Here is the rule: Push only. Do not cut. Cutting cuticles opens a door for bacteria and infection. It also makes the cuticle grow back thicker and uglier. Just push them back gently.
Step 6: Dry Your Feet Completely
Pat your feet dry with a towel. Pay special attention between your toes. That area stays damp easily and can lead to athlete’s foot or other fungal problems.
Step 7: Apply Foot Lotion
Take a generous amount of foot cream or regular body lotion. Massage it into your feet, ankles, and even up your calves if you want.
Spend an extra 30 seconds on your heels. Really work the lotion into any cracked or dry areas.
Step 8: Apply Base Coat (If Using Polish)
If you want color on your toes, start with a thin layer of base coat. Paint it onto each toenail. Make sure to cover the very front edge of the nail, the part that sticks out. This helps prevent chipping.
Let the base coat dry for 2 to 3 minutes. Do not rush this. Wet base coat under nail polish causes bubbling and smudging.
Step 9: Paint Your Toenails
Apply your color in thin coats. Two thin coats are always better than one thick coat. Thick polish takes forever to dry and slides around.
Wait 2 to 3 minutes between each coat. Use three strokes per nail: one down the middle, one on the left side, one on the right side.
Wipe up any polish that gets on your skin immediately with a cotton swab or your fingertip while it is still wet.
Step 10: Apply Top Coat
Finish with a clear top coat. This seals everything in and adds shine. It also makes your pedicure last at least twice as long.
Let everything dry for at least 10 to 15 minutes before putting on socks or shoes. Toe polish takes longer to dry than fingernail polish because toes are in smaller, cooler spaces.
10 Quick Answers for Home Pedicures
1. How often should I do a pedicure at home?
Every 2 to 4 weeks. If you just want maintenance without polish, once a week for scrubbing and lotion is plenty.
2. Do I really need special tools?
No. A basin, nail clippers, a pumice stone, and lotion are all you truly need. Everything else is optional.
3. How do I clean my pedicure tools at home?
Wipe metal tools with rubbing alcohol. Let them air dry. Do not share tools with other people. Replace wooden sticks after each use or wash them with soap and water.
4. How long should I soak my feet?
5 to 10 minutes maximum. Longer soaking actually dries out your skin and makes nails too soft to cut cleanly.
5. Can I use Epsom salt in my foot bath?
Yes. Add half a cup. It helps with sore, tired feet and softens calluses slightly. It is not a miracle cure, but it feels nice.
6. Is it safe to cut my cuticles?
No. Never cut your cuticles. Push them back gently. Cutting them leads to infection, redness, and swelling almost every time.
7. How do I trim thick toenails safely?
Soak feet first to soften them. Use large toenail clippers. Cut straight across in small bites, not one big snip. File down any sharp edges.
8. What do I do with a broken toenail?
Trim off the loose piece if it is already detached. Leave the rest alone. Apply antibiotic ointment and cover with a bandage if it is sore. It will grow out on its own.
9. Can I use Vaseline instead of foot lotion?
Yes. Vaseline works great, especially on cracked heels. Apply a thin layer at night and wear socks to bed. Your feet will be much softer in the morning.
10. How often should I put lotion on my feet between pedicures?
Every day if you have dry skin. Every other day if your feet are normal. The number one reason feet get rough and cracked is simply lack of moisturizer.
The Bottom Line
Doing a pedicure at home is not complicated. Soak for 10 minutes. Trim straight across. Scrub the rough spots. Push back cuticles. Lotion everything. Paint if you want.
The biggest mistakes people make are cutting cuticles, soaking too long, and trimming nails into curved shapes. Avoid those three things and your feet will look better than most salon pedicures.
Get a basin, a pumice stone, and a bottle of lotion. That is under $15 total. Your feet will thank you. And your wallet will definitely thank you.