
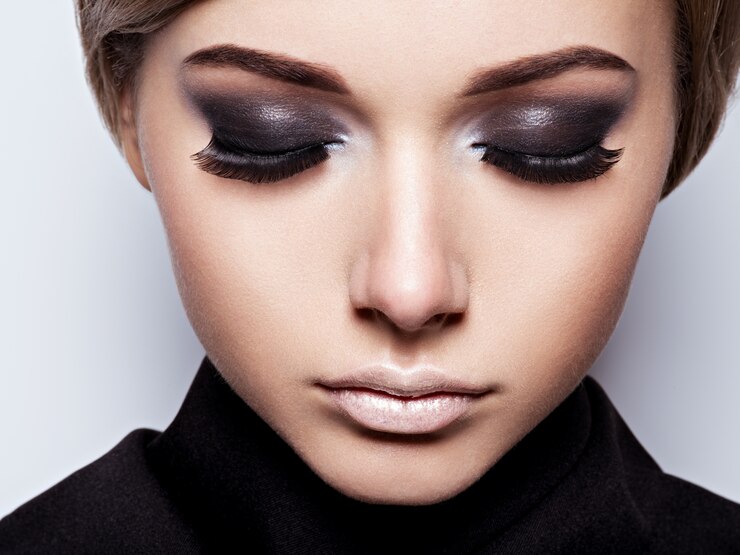
The smokey eye is the undisputed queen of makeup looks. It’s dramatic, timeless, and instantly elevates any outfit. Yet, for many, the phrase “smokey eye” triggers memories of muddy colors, harsh lines, and raccoon-like fallout.
The good news? Mastering how to do a smokey eye for beginners is entirely achievable. You don’t need to be a professional makeup artist; you just need the right technique, the proper tools, and a little patience.
Whether you want a subtle daytime glow or a bold, head-turning evening look, this step-by-step guide will teach you flawless smokey eye techniques that actually work.
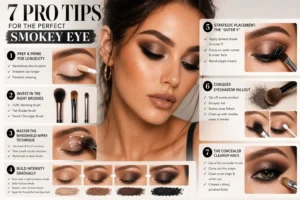
7 Pro Tips for a Flawless Smokey Eye
1. Prep and Prime for Longevity
The biggest mistake beginners make is applying shadow directly to bare skin. An eyeshadow primer is non-negotiable. It neutralizes eyelid discoloration, creates a tacky base for pigments to grip onto, and prevents creasing. Pro Tip: Set your primer with a light dusting of translucent powder or a skin-toned eyeshadow before applying color. This gives your blending brush something to glide over, preventing patchiness.
2. Invest in the Right Brushes
You cannot achieve a seamless blend with the wrong tools. You only need three key brushes for a perfect smokey eye:
- A Fluffy Blending Brush: For diffusing colors into the crease.
- A Flat Shader Brush: For packing color onto the mobile lid.
- A Small Pencil/Smudger Brush: For precise application along the lower lash line and outer corner.
3. Master the “Windshield Wiper” Blending Technique
Blending is the make-or-break step. To avoid harsh lines, use your fluffy brush in gentle “windshield wiper” motions (back and forth) at the crease, followed by small, light circular motions to diffuse the edges. Always blend with a clean brush at the end to melt the colors together seamlessly.
4. Build Intensity Gradually (The “Less is More” Rule)
It is always easier to add more product than to take it away. Start with a light, neutral transition shade (a matte color slightly darker than your skin tone) in the crease. Gradually build up to your medium and darkest shades. This layered approach ensures you maintain control over the depth and prevents the look from becoming too heavy too quickly.
5. Strategic Placement: The “Outer V”
To create a lifted, elongated eye shape, concentrate your darkest shade (black, deep brown, or charcoal) strictly on the outer V of your eye (the outer corner and the outer third of the crease). Use a smaller brush to place the color, then a clean fluffy brush to soften the edges inward.
6. Conquer Eyeshadow Fallout
Dark pigments are notorious for dropping onto your cheeks. To prevent eyeshadow fallout, tap your brush firmly against the back of your hand to remove excess powder before it touches your eye. Alternatively, do your eye makeup before your foundation. If fallout does happen, simply sweep it away with a dry, fluffy brush or clean it up with a Q-tip dipped in micellar water after your eye look is complete.
7. The Concealer Cleanup Hack
The secret to a professional, sharp smokey eye is a clean perimeter. Take a flat, synthetic concealer brush dipped in a matte, full-coverage concealer. Carve out the shape of your eyeshadow, cleaning up the outer edge and the area just beneath your lower lash line. This creates a striking contrast that makes the smokey colors pop and instantly looks polished.
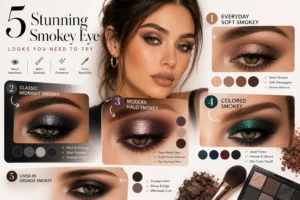
5 Smokey Eye Variations for Every Occasion
The traditional black smokey eye isn’t the only option. Here are five modern variations to suit your personal style:
1. The Everyday Soft Smokey
- The Vibe: Effortless, polished, and office-appropriate.
- The Palette: Warm browns, taupes, and soft champagnes.
- The Technique: Use a matte taupe in the crease, a shimmery light brown on the lid, and skip the heavy black liner. Finish with a generous coat of brown mascara.
2. The Classic Midnight Smokey
- The Vibe: Glamorous, dramatic, and perfect for evening events.
- The Palette: Matte black, charcoal gray, and silver or gunmetal shimmer.
- The Technique: Pack the black shadow on the outer lid and lower lash line, blending a gray transition shade above it. Add a metallic shimmer to the center of the lid for dimension.
3. The Modern Halo Smokey
- The Vibe: Eye-opening and dimensional.
- The Palette: A deep matte shade (like plum or espresso) and a blinding metallic shimmer.
- The Technique: Place the dark matte shade on the inner and outer thirds of the eyelid, leaving the very center bare. Press the bright shimmer directly into the center of the lid to create a “halo” of light.
4. The Colored Smokey
- The Vibe: Bold, creative, and fashion-forward.
- The Palette: Jewel tones like emerald green, sapphire blue, or deep burgundy.
- The Technique: Apply the colored shadow exactly as you would a traditional black smokey eye. Pro tip: Use a black eyeshadow underneath the colored shadow to make the vibrant hues appear richer and more intense.
5. The Lived-In Grunge Smokey
- The Vibe: Edgy, rock-and-roll, and effortlessly cool.
- The Palette: Dark brown or black kohl pencil, paired with a muted matte shadow.
- The Technique: Skip the fluffy blending. Apply a thick layer of kohl pencil to the upper and lower lash lines, then aggressively smudge it out with a pencil brush. The messier, the better.
Where to Build Your Smokey Eye Kit
Ready to put these techniques into practice? Here are our top recommendations for sourcing high-quality, reliable products to build your perfect smokey eye collection:
- Start with a Smooth Base: A good primer is the secret to crease-free wear. Shop top-rated eye primers at Sephora or browse the extensive eye primer collection at Ulta.
- Upgrade Your Tools: Seamless blending requires the right brushes. Find highly-rated, affordable makeup brush sets for beginners on Amazon, or explore professional-grade options in Ulta’s makeup brush section.
- Find Your Perfect Palette: Whether you want classic charcoals or bold jewel tones, discover versatile eyeshadow palettes at Sephora or check out Ulta’s curated eyeshadow selections.
- Master the Cleanup: Achieve that sharp, professional edge with a matte, full-coverage formula. Browse the best concealers at Ulta to find the perfect shade for carving out your eyeshadow.
- Lock It In: Ensure your dramatic look survives the night. Shop long-wearing makeup setting sprays at Ulta or explore Sephora’s top-rated setting sprays.
Frequently Asked Questions (FAQs)
Q: How do I stop my smokey eye from looking muddy?
A: Muddy eyes happen when too many colors are over-blended or when a dark shade is dragged too high into the crease. Keep your darkest color confined to the outer corner and lower lash line, and always use a clean brush to blend the edges.
A: Muddy eyes happen when too many colors are over-blended or when a dark shade is dragged too high into the crease. Keep your darkest color confined to the outer corner and lower lash line, and always use a clean brush to blend the edges.
Q: Can I wear a smokey eye during the day?
A: Absolutely! Opt for an everyday smokey eye look by swapping black for soft browns, taupes, or mauves. Keep the eyeliner subtle and finish with a tinted lip balm to balance the look.
A: Absolutely! Opt for an everyday smokey eye look by swapping black for soft browns, taupes, or mauves. Keep the eyeliner subtle and finish with a tinted lip balm to balance the look.
Q: How can I make my smokey eye last all night without creasing?
A: The trifecta for longevity is: 1) An eyeshadow primer, 2) Setting the crease colors with a matching matte powder, and 3) A quick spritz of a long-wear makeup setting spray when you’re finished.
A: The trifecta for longevity is: 1) An eyeshadow primer, 2) Setting the crease colors with a matching matte powder, and 3) A quick spritz of a long-wear makeup setting spray when you’re finished.
Q: What is the best smokey eye technique for hooded eyes?
A: If you have hooded eyes, apply your transition shade and darkest outer-V color slightly above your natural crease, blending upward toward the brow bone. This ensures the smokey effect remains visible when your eyes are open. Keep the lid shimmer minimal to avoid emphasizing the hood.
A: If you have hooded eyes, apply your transition shade and darkest outer-V color slightly above your natural crease, blending upward toward the brow bone. This ensures the smokey effect remains visible when your eyes are open. Keep the lid shimmer minimal to avoid emphasizing the hood.
Q: Can I pair a smokey eye with a bold, red lip?
A: You can, but it requires balance. If you are doing a heavy, dark smokey eye, opt for a softer, muted lip (like a nude or soft pink). If you want a bold red lip, scale back the eye makeup to a soft, neutral smokey look so your features don’t compete for attention.
A: You can, but it requires balance. If you are doing a heavy, dark smokey eye, opt for a softer, muted lip (like a nude or soft pink). If you want a bold red lip, scale back the eye makeup to a soft, neutral smokey look so your features don’t compete for attention.
Final Thoughts: Practice Makes Perfect
Creating a mesmerizing smokey eye is a skill, and like any skill, it requires a little practice. Don’t be discouraged if your first attempt isn’t magazine-perfect. Keep a pack of makeup wipes or Q-tips nearby, experiment with different smokey eye color palettes, and focus on your blending technique.
Soon, you’ll be able to whip out a flawless, head-turning smokey eye in minutes. Grab your brushes, put on your favorite playlist, and start blending!