

If you’re tired of chipped polish and frequent touch-ups, you might be ready to join the solid gel revolution. Born Pretty has carved out a niche for itself in the beauty world, offering a vast array of nail art supplies and gel polishes that are budget-friendly without sacrificing quality. Their solid gel polishes, which come in a pot rather than a traditional bottle, are a unique and increasingly popular option.
Page Contents
What is Solid Gel Polish?
Unlike traditional liquid gel polishes, solid gel has a thicker, creamier, almost putty-like consistency. This might sound intimidating, but it’s actually what makes it so appealing.
As one reviewer noted, the “creamy formula makes it just glide onto the nail in a way that is different from gel polish in a bottle”. It’s designed to be scooped out and applied, offering more control and less mess. The result is a glossy, durable finish that can last for two to three weeks, just like a salon gel manicure.
My Honest Experience
After a few attempts and some trial and error, I’ve come to appreciate the solid gel system. It’s a bit of a learning curve from traditional polish, but the payoff is worth it. The thickness of the polish means it’s less likely to pool in your cuticles, a common problem with liquid gels. It also seems to self-level more effectively, reducing the appearance of brush strokes and creating a smoother, more even finish.
One of the most impressive aspects is the color payoff. The shades are vibrant and opaque, often requiring only one to two coats for full coverage. The brand is especially known for its creative and unique color collections, including popular jelly, cat-eye magnetic, and holographic finishes.
How to Apply Born Pretty Solid Gel Polish: A Step-by-Step Guide
If you’re ready to try it for yourself, here is a foolproof guide to help you achieve the perfect manicure.
What You’ll Need:
-
Born Pretty Solid Gel Polish (Available on Amazon US)
-
UV/LED Lamp for curing
-
Base Coat and Top Coat
-
Nail File and Buffer
-
Cuticle Pusher
-
Lint-free Wipes
-
Isopropyl Alcohol (91% or higher) or a Gel Cleanser
Step-by-Step Application:
-
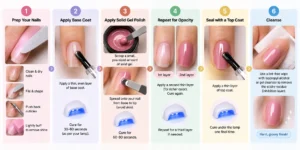
Prep Your Nails: This is the most critical step for longevity. Start with clean, dry nails. Use a nail file to shape your nails and gently push back your cuticles. Lightly buff the surface of your nails to remove any shine. This creates a rough surface for the polish to adhere to.
-
Apply the Base Coat: Apply a thin, even layer of base coat to your nails. This protects your natural nails and provides a sticky surface for the gel polish. Cure under your UV/LED lamp for the time recommended by your lamp’s manufacturer (usually 30-60 seconds).
-
Apply the Solid Gel Polish: This is where it gets interesting. Using a small spatula or the applicator tool that often comes with the polish, scoop a small, pea-sized amount of the solid gel. Gently spread it onto your nail, starting from the base and moving towards the tip. Try to avoid getting it on your cuticles or skin. Cure each layer under the UV/LED lamp for 60-90 seconds.
-
Repeat for Opacity: For richer, more opaque color, apply a second thin layer of the solid gel polish, and cure again. Depending on the shade, you might even need a third layer for full coverage.
-
Seal with a Top Coat: Finish with a top coat to seal in the color, add extra shine, and protect your manicure. Cure under the lamp one final time.
-
Cleanse: After curing, your nails will have a sticky, tacky residue called the inhibition layer. This is normal. Use a lint-free wipe soaked in isopropyl alcohol or a specialized gel cleanser to wipe it away. This reveals the hard, glossy finish underneath.
The Pros and Cons
Pros:
-
Long-Lasting: With proper application, this polish can easily last 2-3 weeks without chipping.
-
Affordable: It provides salon-quality results at a fraction of the cost. You can find a UV/LED lamp starter kit for around $30, and individual polishes are often under $10.
-
Wide Range of Colors: Born Pretty offers an extensive palette, from classic nudes and sheers to bold neons and shimmering glitters.
-
Mess-Free Application: The thicker consistency allows for more control and reduces the likelihood of flooding your cuticles.
Cons:
-
Learning Curve: It requires a bit of practice to get the hang of scooping and applying the solid gel evenly.
-
Requires a UV/LED Lamp: You cannot use this polish without a lamp; it’s essential for the curing process.
-
Removal Process: Like all gel polishes, removal requires soaking in acetone, which can be drying to the nails and surrounding skin if not done properly.
The Verdict
Born Pretty Solid Gel Polish is a fantastic option for anyone looking to elevate their at-home manicure game. It offers the durability and high-gloss finish of a professional gel manicure but with a unique, user-friendly application that many find easier to control than liquid gels. While it requires an initial investment in a UV/LED lamp and some practice, the cost savings and beautiful, long-lasting results make it a worthwhile investment for any nail enthusiast.
Frequently Asked Questions (FAQs)
Q: How do I remove Born Pretty Solid Gel Polish?
A: The removal process is similar to other gel polishes. Gently file the shiny top coat off your nails. Soak a cotton ball in pure acetone, place it on your nail, and wrap it in aluminum foil. Let it sit for 10-15 minutes. The polish should then easily slide off with a cuticle pusher. Avoid peeling or scraping the polish off, as this can damage your natural nails.
Q: Can I use Born Pretty Solid Gel Polish without a UV/LED lamp?
A: No. A UV/LED lamp is required to cure the gel polish. Without it, the polish will not harden or set properly, and it will not last.
Q: How many layers of polish should I apply?
A: For best results, apply two thin layers of the solid gel polish. This ensures even coverage and rich, opaque color. Some shades may require three coats.
Q: Is Born Pretty Solid Gel Polish safe for my nails?
A: Yes, when used correctly and with a base coat, it shouldn’t damage your natural nails. Always follow proper removal techniques to avoid any harm. It is also recommended to give your nails a break between gel manicures.